How to Build a Cross Chain Voting OApp: Smart Contracts Interaction
In the previous part of our guide, we prepared the smart contract code for our cross-chain voting application, configured the LayerZero environment, and successfully deployed the contracts on the Sepolia and Amoy networks. Today, we’ll focus on the next critical steps: verifying the smart contracts on a blockchain explorer, establishing communication between the chains, and testing the functionality to ensure everything works as expected.
Verifying Smart Contracts on Blockchain
Verification of the smart contract allows for direct interaction with the contract and is a crucial step to ensure that the front-end application, which we will prepare in the next section, can properly communicate with the contract. Additionally, this enables us to use the contract’s functions through the blockchain explorer, allowing for the simulation and testing of its functionality.
When working on the Sepolia and Amoy test networks, we can verify our smart contracts on the respective blockchain explorers:
- Sepolia: https://sepolia.etherscan.io/
- Amoy: https://amoy.polygonscan.com/
The contract addresses generated during deployment need to be entered into the search bar on the appropriate blockchain explorer for Amoy and Sepolia. Make sure to use the correct address for each network. The verification process is demonstrated in the video below.
Compiler Type should be set to Standard-Json-Input, and the Compiler Version must match the one used in your application, which can be checked in the hardhat.config.ts file. In my case, it’s v0.8.22. The license must also match the contract’s license, in this case, MIT.
Next, you need to upload the contract source code, which is generated during deployment and located in the project directory: \deployments\amoy-testnet\solcInputs and \deployments\sepolia-testnet\solcInputs.
Finally, confirm by clicking Verify and Publish. If everything goes smoothly, you’ll receive the following confirmation message.
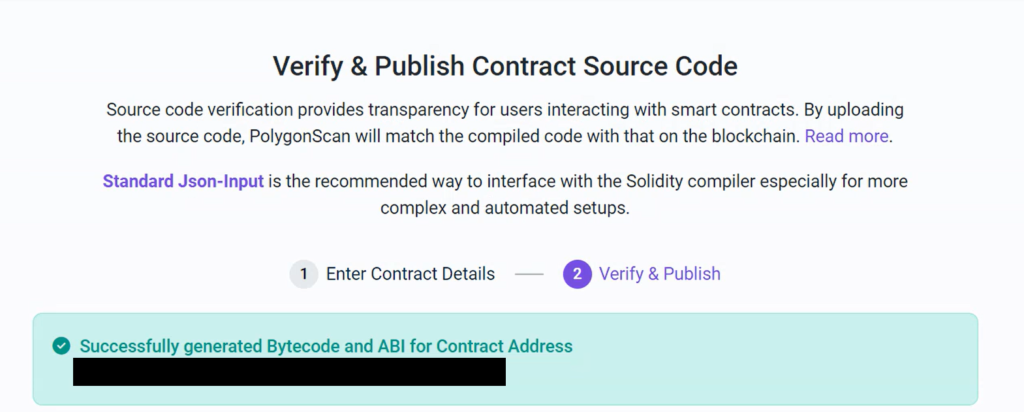
The same steps must be followed for Sepolia. Make sure to remember to use a different file for the contract source code. For Sepolia, the source code is located in \deployments\sepolia-testnet\solcInputs.
Smart Contracts – SetPeer Function
The SetPeer function is crucial for establishing communication between smart contracts deployed across different blockchain networks. This function ensures that contracts can recognize and securely interact with each other.
After verifying the contract, we now have access to its functions, including the SetPeer function. To set it up, you need to revisit the blockchain explorer for the respective network (Sepolia and Amoy).
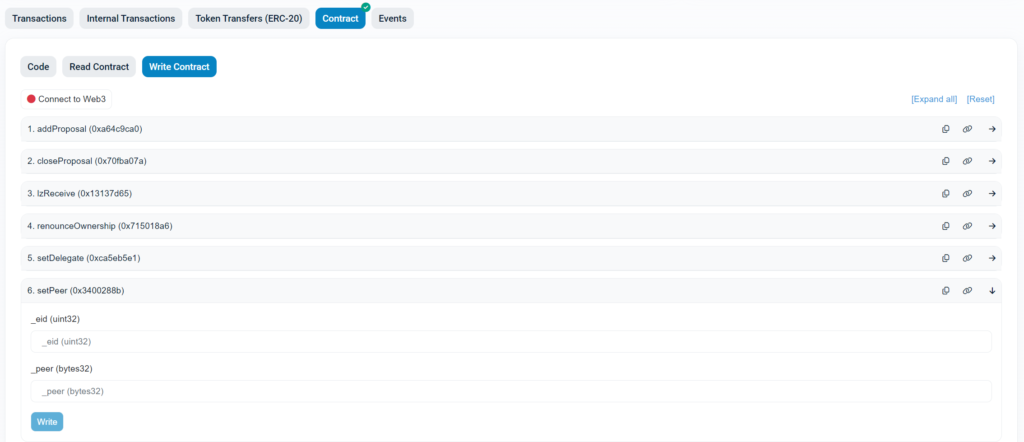
Now we have two fields to fill: eid and peer. Eid is the chain ID that represents the specific blockchain network. You can find the eid values on the following page: LayerZero Deployed Contracts.
In our case, we will be using 40161 for Sepolia and 40267 for Amoy.
The peer field refers to the contract address on the other network with which you want to establish communication. The contract address consists of 20 bytes, but the field requires a total of 32 bytes. Therefore, you need to prepend the address with 24 zeros (12 bytes) to match the required length.
After filling out the eid and peer fields, you confirm the transaction in MetaMask. Similar steps need to be followed on the Amoy network, but this time, use the eid that points to Sepolia (40161) and the contract address deployed on Sepolia.
Smart Contracts – Generating Options
Before working on the proposals, let’s generate the options that will be needed to determine the gas limit on the target chain. The Generate Options function can be found under the Read Contract tab (as it is a read-only function and does not modify the contract).
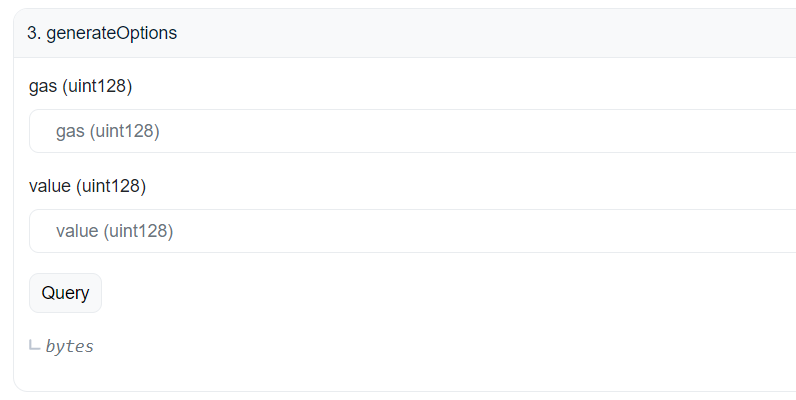
Parameters of the Generate Options Function
- gas – This represents the gas limit required for executing the transaction on the target chain.
- value – This refers to the amount of cryptocurrency (usually in the native token of the network).
For the gas parameter, we will set it to 200000, which is a safe value for our functions. As a best practice, it is recommended to write tests for each function to determine exactly how much gas is required for the lzReceive function. However, I will cover the topic of testing and calculating gas usage in a separate article.
As for the value parameter, we can set it to 0 initially. This is because we will later use a quote function to dynamically calculate the actual amount required to cover the transaction costs.
After clicking Query, we will receive the following result:
0x00030100110100000000000000000000000000030d40It is important to note that the last few characters of this output represent the gas amount in hexadecimal format. You can save this value as it will be reused consistently for similar transactions across the chain, ensuring a proper gas limit each time.
Adding Proposal
Quote
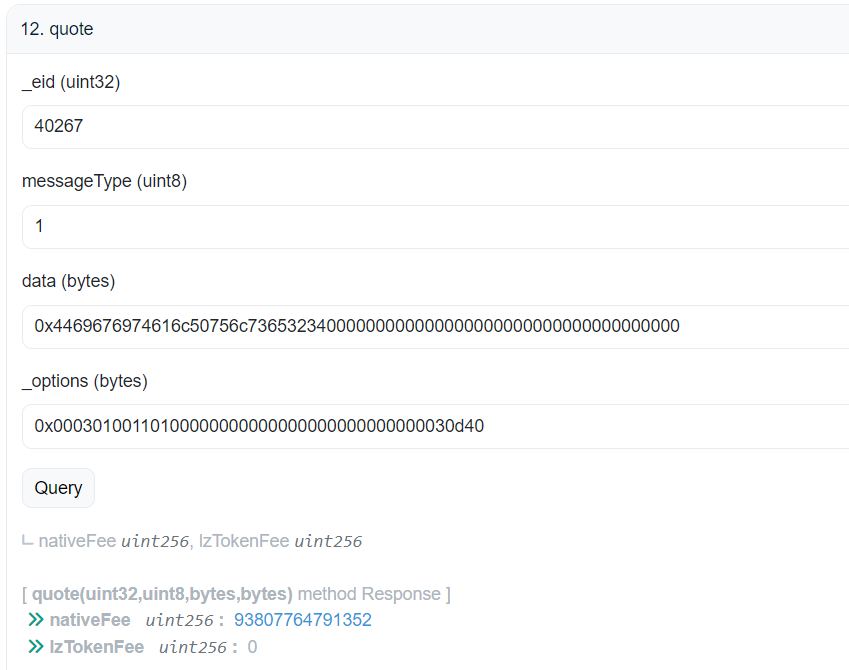
The last step before adding the proposal is to generate the payableAmount using the quote function. Since we are sending the transaction from Sepolia, we will set the eid (chain ID) to 40267, which corresponds to the target network.

For the messageType, according to our contract (as defined in the MsgCodec.sol), the message type for adding a proposal is set to 1.
The data parameter contains the information we want to send when adding a proposal. In this case, we are only interested in the description. Let’s encode the description DigitalPulse24 into 32 bytes (in hexadecimal format). The hexadecimal representation of DigitalPulse24 padded to 32 bytes is:
0x4469676974616c50756c73653234000000000000000000000000000000000000Note: In the final version of the application, this encoding will be handled by the front-end automatically.
In my case, the value generated from the quote function is 93807764791352, which is provided in wei. You can use a tool like eth-converter.com to convert this value to Ether. The equivalent value in Ether is 0.000093807764791352.
Proposal
Now that we have everything ready, we can proceed to add the proposal. Navigate to the Write Contract tab.
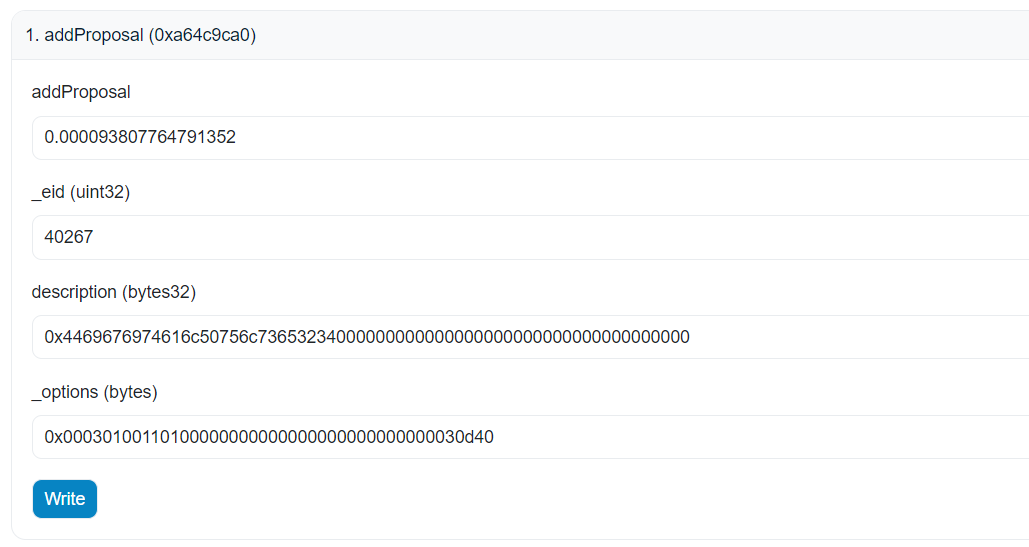
Parameters of the Add Proposal Function
- payableAmount – This is the fee to cover the cost of executing the lzReceive function on the target network. Every operation that changes the state of the smart contract, such as adding a new proposal, requires an additional fee.
- eid (chain ID) – Specifies the blockchain network to which the message is being sent.
- description – This is the description of the proposal that will be displayed to voters. For simplicity, I’ve stored it as a bytes32, which allows for a maximum of 32 ASCII characters.
- options – This parameter represents the gas limit needed to process the transaction on the target network. It corresponds to the value we generated in the previous step.
After filling in the required fields, you can click Write and confirm the transaction in MetaMask. You can check the status of your transaction on testnet.layerzeroscan.com by entering your wallet address into the search bar.

After a few moments, you should see the status marked as Delivered, which indicates that the transaction has successfully passed between networks.
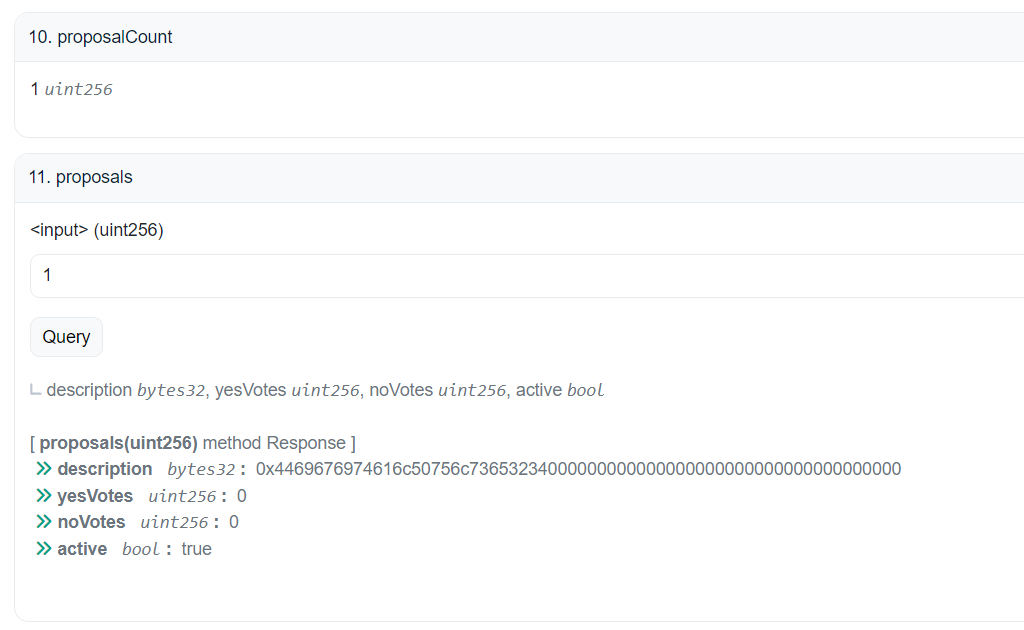
To confirm the success of the proposal, you can navigate to the Read Contract tab on both the Amoy and Sepolia networks. You should be able to retrieve the corresponding data, which indicates that the proposal has been successfully added on both chains.
Voting Proposal
We need to start again with the quote function, but this time only the data and messageType will change. For the data, we need to include the voter’s address, the proposal ID, and the vote cast. Each of these values must be encoded into 32 bytes. In my case, the values are:
Address: 000000000000000000000000XXXXXXXXXXXXXXXXXXXXXXXXXXXXXXXXXXXXXXXX (metamask)
Proposal ID: 0000000000000000000000000000000000000000000000000000000000000001
Vote: 0000000000000000000000000000000000000000000000000000000000000001

messageType: 2
Data: 0x000000000000000000000000XXXXXXXXXXXXXXXXXXXXXXXXXXXXXXXXXXXXXXXX00000000000000000000000000000000000000000000000000000000000000010000000000000000000000000000000000000000000000000000000000000001
After generating the quote, we proceed by filling in the necessary fields for the Vote Proposal function. Once everything is filled out, click Write to submit the transaction.
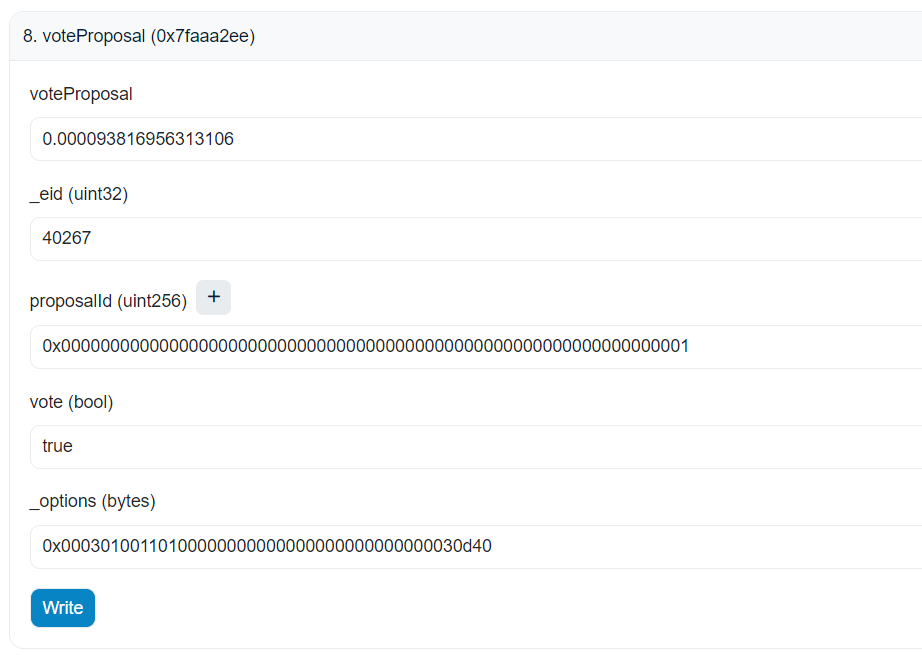
The result can once again be checked in the Read Contract tab. The number of votes cast should increase, reflecting the new vote.
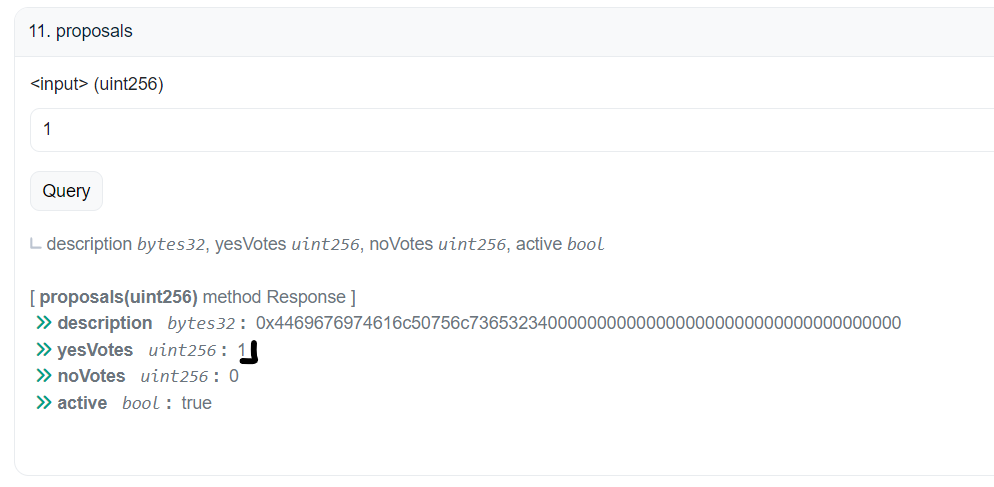
Closing Proposal
The last function to test is closing the proposal. For this, when generating the quote, we set the messageType to 3. In the data field, we only need to provide the proposal ID, which should also be encoded in 32 bytes.
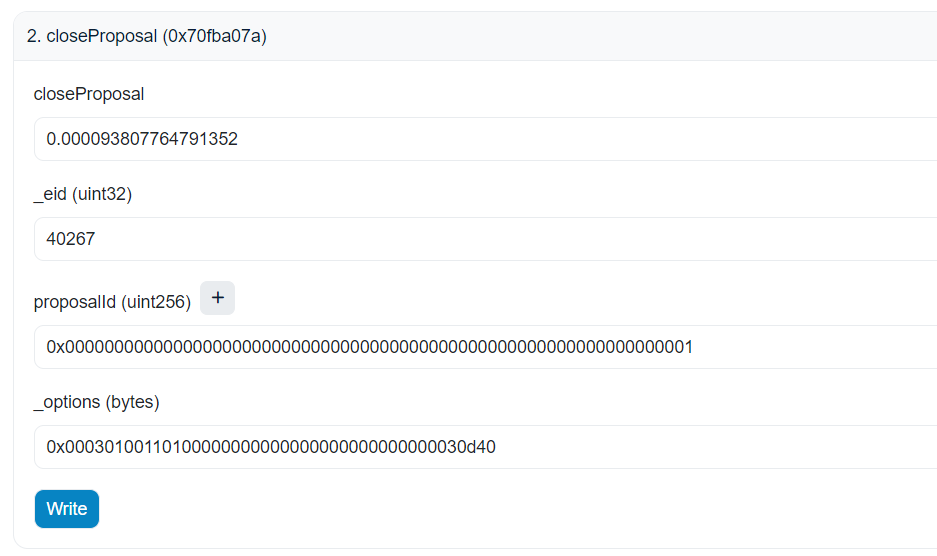
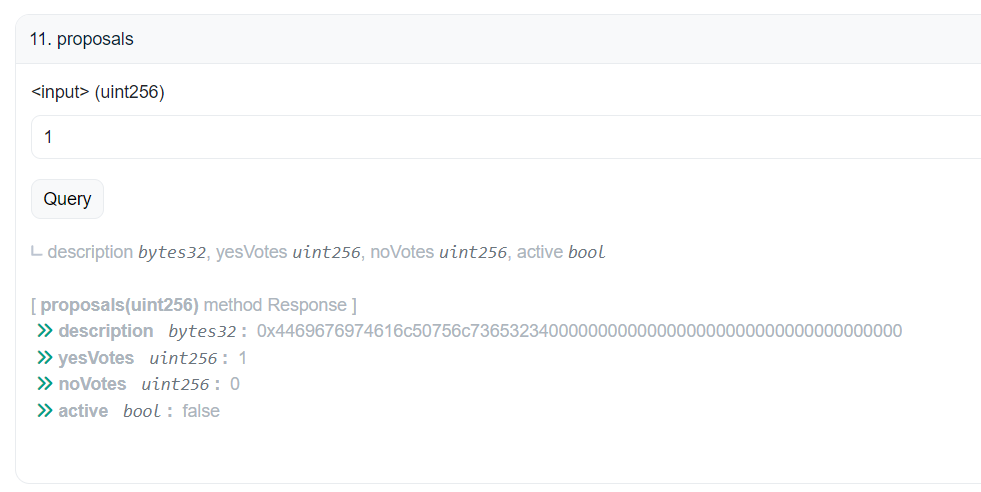
After filling in the Close Proposal function, click Write to submit the transaction. Then, check the Read Contract tab to confirm that the status of the proposal has changed to false, indicating that the proposal has been successfully closed.
Summary
In this article, we walked through the entire process of adding, voting, and closing proposals across multiple blockchain networks. We began by generating options, understanding the parameters needed for each function, and carefully configuring the interactions between smart contracts on different chains.
This was certainly a lot of information to digest, but each step is crucial for mastering cross-chain interactions and ensuring a smooth and secure process. As you continue building your application, these fundamental concepts will be key to scaling and enhancing its functionality.
In the next part of this guide, we will create the front-end for the application using React.

